The Duty Roster
Use the week, day and list views, display settings, the workforce panel and the shift history
Open the duty roster via Shift plan → Duty rosters in the sidebar. The week view has two halves:
- Top — the planning grid: rooms as rows, days as columns (grouped into calendar weeks, "KW"). Each cell shows the events taking place in that room on that day, with their shifts, plus standalone shifts. Only rooms with the room property Relevant for disposition appear as rows (see Rooms, areas & booking access).
- Bottom — the workforce panel: all workers who can take shifts, grouped by craft, with their weekly hour balance. This is where you drag people from when assigning staff.
The divider between the two halves can be dragged to resize, and the panel can be collapsed entirely.
The three views
The view switch Week | Day | List in the function bar toggles between three presentations of the same plan:
| View | Use it for |
|---|---|
| Week | Rooms and days in a grid, assignment by drag & drop — the main planning view |
| Day | One day with all shifts and their assignments — see Daily view |
| List | All shifts of the period as a list — see List view |
Filters and period are stored per view: switching from the week to the list and back brings your narrowing back.
Views show the same data
Week, day and list view are not separate rosters. A change is immediately visible in all views, in the project and in My operational plan.
The function bar
From left to right:
| Control | What it does |
|---|---|
| Date range | Two directly editable date fields showing weekday, calendar week and number of days. At most 6 months are loaded: a longer period (also from the quick selection, such as Next 12 months) is cut to six months from the start date, and Artwork briefly shows the notice Maximum 6 months possible in the display. The calendar icon opens Select period with the mode chips Day, Week, Month, Free selection, the quick selection (Today, Current week, Current month, Next 7/14/30/90 days …) and two month calendars; clicking a calendar week number selects that week. With Free selection you click the start day first and then the end day. The selection in the window only takes effect after Apply. Keyboard with the bar focused: ←/→ page, T jumps to today. |
| Current week / Current month | Two buttons next to the date range jump to the running week or month with one click. Today is reachable via the quick selection in Select period or the T key. |
| Arrow navigation | The arrows Time range back / forward next to the date fields shift the loaded period by its own length. If exactly one whole calendar month is selected, they jump to the previous or next whole month. |
| Scroll mode | A second group of arrows with a mode icon between them (tooltip Change scroll mode): Jump by day, Jump by calendar week or Jump by month. These arrows scroll within the loaded period to the next day column, calendar week or first day of the next month, without reloading. The mode is stored per person and also applies in the list view and in article planning. |
| Project search (compass toggle) | Locks the visible period to a project: search for a project or artist and the roster shows exactly its time span, with a link to the project's shifts tab. |
| View | The switch Week | Day | List. |
| Zoom | Levels 55 %, 75 % and 100 % (also Ctrl/Cmd + mouse wheel): narrows the day columns so more days fit at a glance. Below 100 % shifts appear as a compact pill with time, craft abbreviation and staffing; a click opens the shift. You can also drag people onto the compact pill Coming with the next update; to assign someone to a specific function slot, zoom back to 100 %. See Views & Display Settings. |
| Edit (pencil switch) | Multi-edit mode: select several room/day cells and create or delete shifts in bulk. The tooltip explains what the mode does. Only visible with the permission Plan shifts. |
| Display settings (gear) | Personal display options — fully explained under Views & Display Settings. |
| Filter (funnel) | Opens the filter panel. |
| Help & legend (info icon) | Opens the help panel with legend, operation and workflow. |
| Commit (calendar check) | Commits the plan or submits it for approval, see Committing & Approval. Only visible with the permission Commit duty rosters. |
| History (clock) | The shift history. |
| Export (file) | PDF/Excel exports — see Exports. |
| Fullscreen (arrows) | Toggles fullscreen mode. |
| Calendar subscription (calendar star, tooltip Subscribe to shift calendar) | Personal roster as ICS feed, see Exports. Only visible with the permission Subscribe to roster calendar. |
On narrow screens the function bar collapses: below 1536 px width, zoom, Help & legend, commit, history, export, fullscreen and the calendar subscription move into the More options menu; display settings and filter stay visible as buttons.
Project mode
The project search does more than enable a filter. It adopts the calculated project period, shows the related events and shifts and provides a direct way back into the project. A production can be planned completely without parallel projects overloading the grid. The period can be adjusted manually afterwards if needed.
Filters
The filter panel narrows the grid down to what you're working on. Filters can be saved ("Saved filters") and re-applied with one click; active filters appear as removable tags.
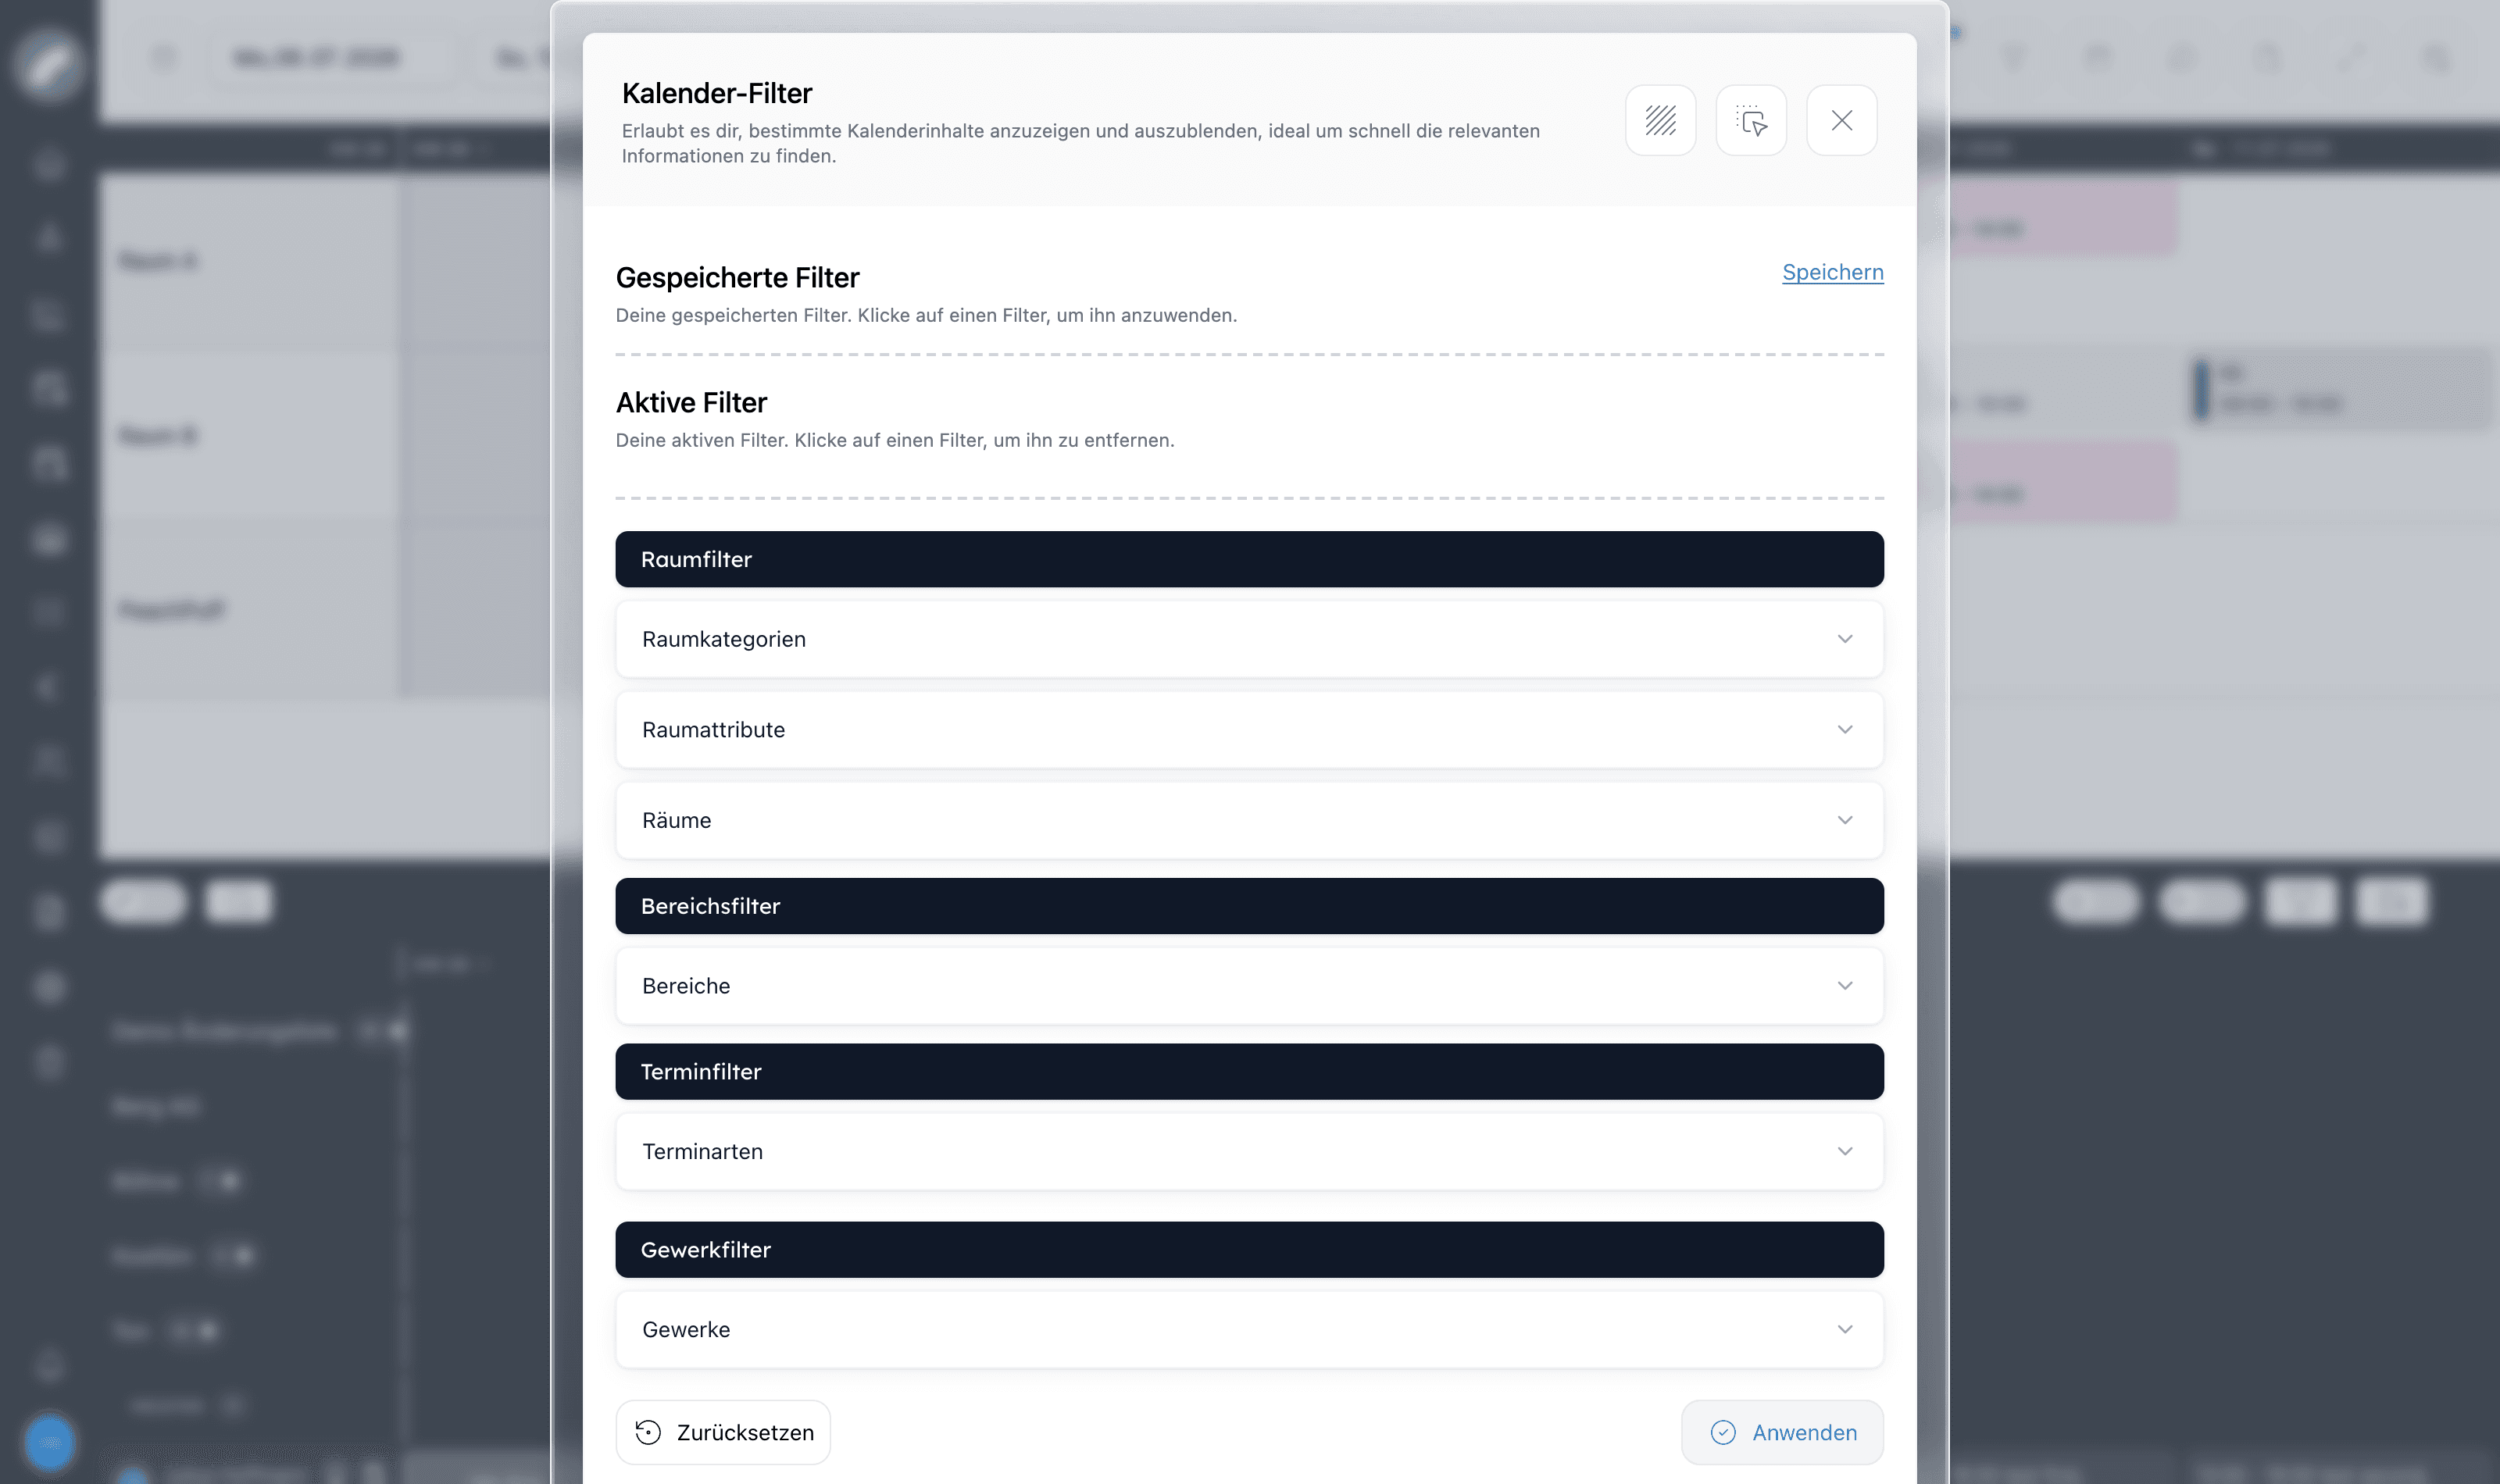
You can filter by:
- Rooms — room categories, room attributes, individual rooms
- Areas — the building areas rooms belong to
- Event types — e.g. only performances, only setup times
- Crafts — only show shifts of selected crafts
In the week and the daily view, the filter window also offers the toggle Only show shifts that are not fully staffed under Shift Filters. It is the same one as in the display settings.
The workforce panel has its own people filter.
Display settings
The gear icon opens the display settings. They are personal to you and persist between sessions. The window only shows settings that take effect in the view currently open — so the week view has different options than the daily and list views, and the daily view and the project shifts tab share one set.
The most important options of the week view: Show events (off = shifts only), Hide unoccupied rooms, Only show shifts that are not fully staffed, Show staffing per craft, Show qualifications, Show description and Expand days. Every option with its effect, the views it applies in and when to use it — including those of the daily and list views — is described under Views & Display Settings.
If the day remarks column is activated for your instance, the day notes from the calendar are also shown in the duty roster. Room names and the date row move along while scrolling, so they stay visible even with tall, filled cells.
The workforce panel
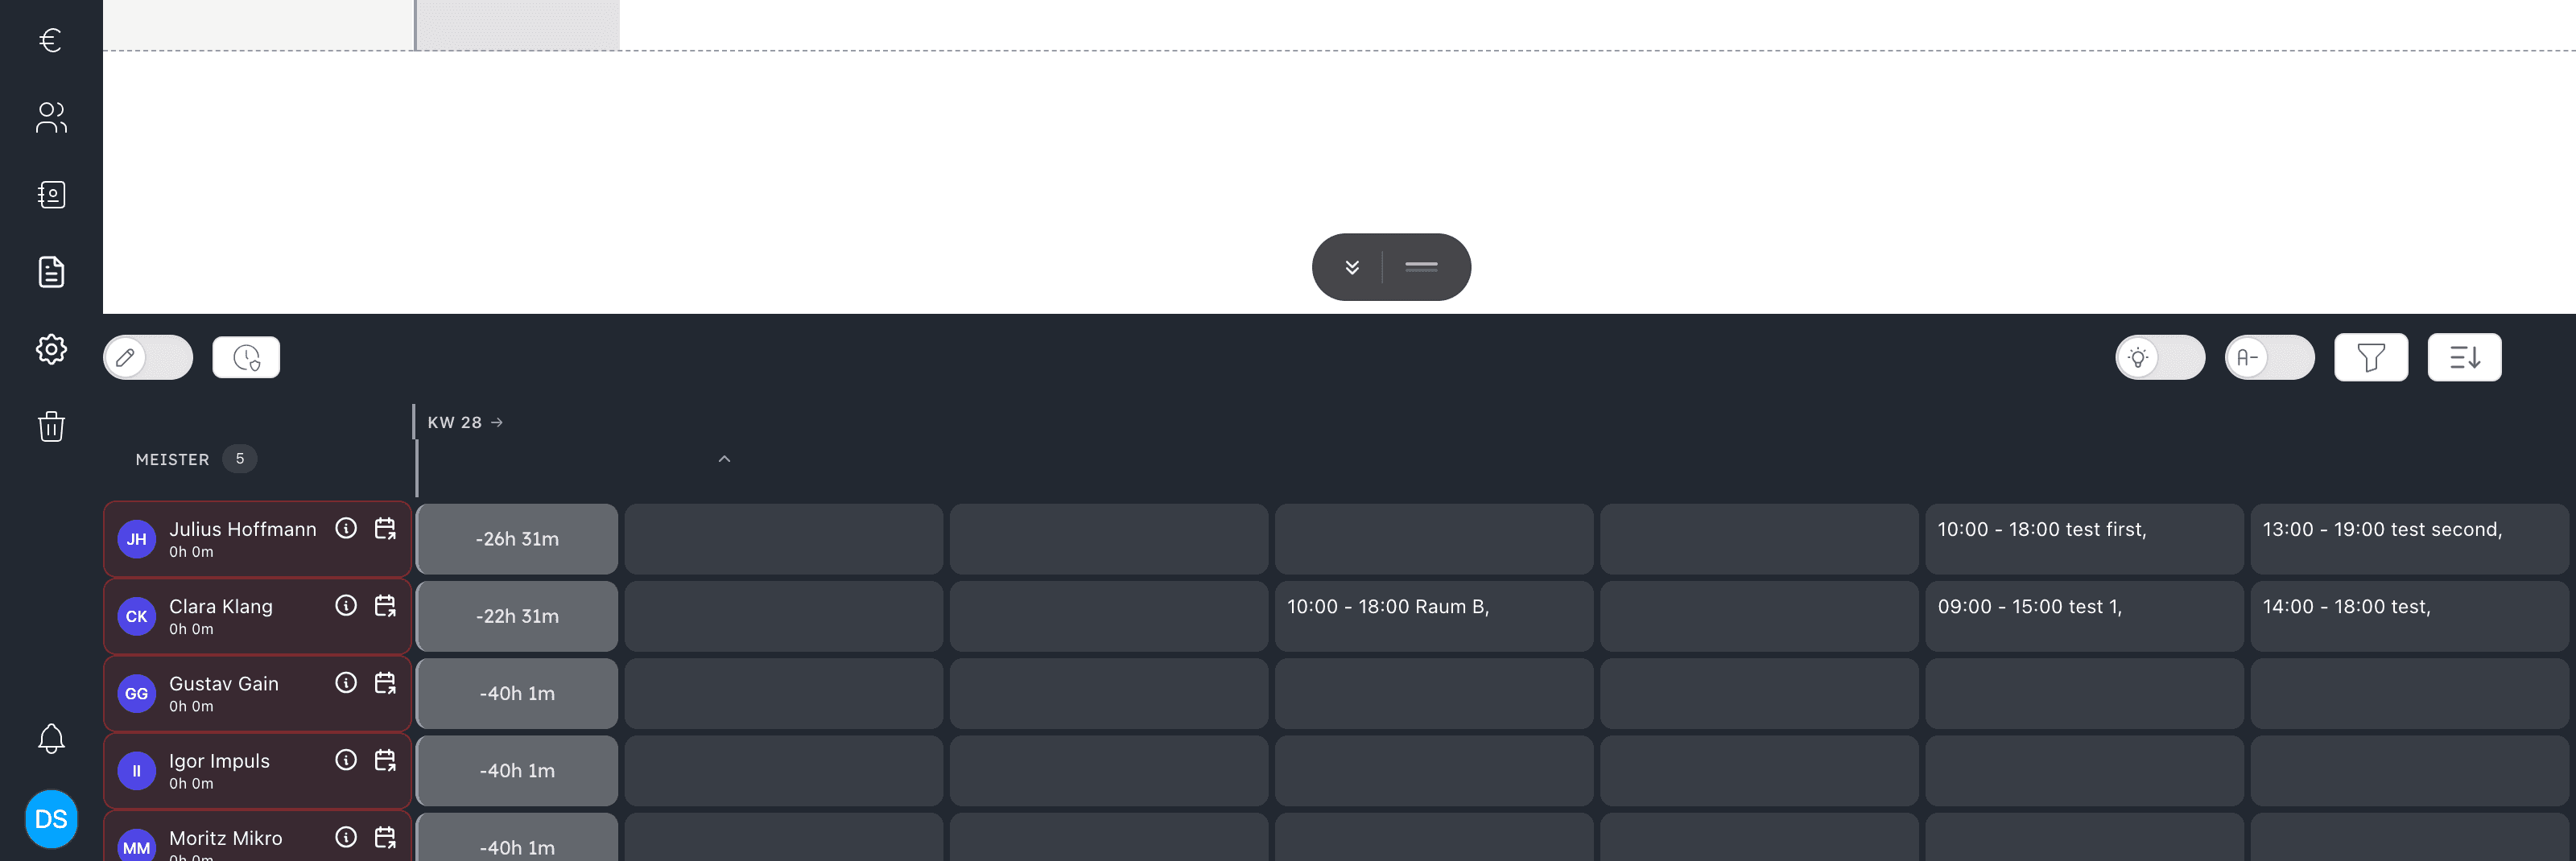
Each craft expands into its workers; within the craft, people are grouped by function. Expanding and collapsing reacts immediately and remembers which crafts are open even with an active craft filter. Per worker row you see:
- Avatar and name — with an info button for the info window and a link to their individual roster
- Hour balance — the chip shows the week's planned time against the
contracted hours (e.g.
-22:30 hmeans 22.5 hours still unplanned); green and red indicate over- and under-planning - Day cells — each assignment appears as a chip (e.g.
10:00 – 18:00 Raum B), so you always see who is already booked and when. With shift confirmation active, the reply status sits next to it as a coloured pill: blue requested, green accepted, red declined (details and comment in the hover text). - Day service balls — day services are filled completely in their colour; the icon is automatically white or black depending on the brightness of the colour.
When someone enters, changes or deletes an availability or absence, the person row updates in all open duty roster windows without reloading — also for the day status from the day modal and for changes made via multi-edit. After reloading, navigating dates or changing filters, the workforce panel returns to the position you last scrolled to.
Toolbar of the workforce panel
The panel has its own controls: an edit switch (multi-edit on worker cells with the actions Edit Entries and Delete Entries), the button Create individual time series for recurring individual times, day services (these three only with the permission Plan shifts), the highlight switch (click a shift to highlight its assigned workers), the compact view, a sun/moon switch that renders the workforce panel light or dark (the choice is stored per person; plus/minus hours, availability, absence, substitute days off and the staffing traffic light are readable in both modes), the people filter (funnel) and the sort menu (default order by function, grouping by function with or without duplicate entries, alphabetical, alphabetical internal/external — see Sort menu).
People filter
The filter popup of the workforce panel bundles:
- Show freelancer — show or hide freelancers in the workforce panel; the choice survives reloading.
- Only show people with open rule violations — a toggle with a counter of open violations. While it is active, a notice bar above the workforce panel offers Remove filter; an empty result is explained ("No people with open rule violations in this period."). In the daily view this filter sits in the filter window.
- Crafts and functions — narrow the workforce panel to certain crafts or functions.
Staffing per craft
In the craft row of the workforce panel, each day shows a pill staffed/demand with a traffic-light colour (red: less than half of the slots staffed, orange: at least half, green: fully staffed); the KW column shows the weekly total, the tooltip names demand, staffed and open. Clicking the pill filters the grid to the open shifts of that craft, a second click resets the filter. If you don't need the pills, hide them via the display setting Show staffing per craft.
Opening a person and a day in detail
Clicking a day cell opens the day modal with all information about this person for the chosen day, in two columns. You can open other people's rows only with the permission Plan shifts; without it only your own row opens, and the availability status is read-only there.
- Left: the assigned shifts, the project assignments and the individual times. Below each shift — with shift confirmation active — the reply status is shown as a pill (Requested, Accepted on …, Declined on …, with comment); planners can record the reply on the person's behalf right there. The trash button removes the person from the shift.
- Right: the availability status for the day, day comment, rule violations, substitute day off and the availabilities the person has registered.
Under Availability status for this day you choose one of four statuses; their labels follow the language of the interface Coming with the next update, also in the duty roster cell and in multi-edit. For internal users with a work time pattern the status also affects the hour account:
| Status | Meaning | Effect on the hour account |
|---|---|---|
| Available | No entry; the person can be assigned. | None. The work done counts. |
| Work-free day | Absence like vacation. | Counts like vacation: the day is target-neutral (actual = target). Work done anyway is added on top. |
| Not available | Absence like sickness. | Counts like sickness: actual = target. Shifts the person is still assigned to do not count in addition on that day. |
| Free | Free day, either full or half (morning or afternoon). | None. The day counts as a free day in the key figures. |
The conflict check during staffing lists Work-free day as Vacation and Free as Free day (see Conflict check before the assignment).
If you set Free or Not available, Artwork first checks the consequences: shifts and individual times on that day are offered for removal (Yes, remove or No, only change status). For all three statuses other than Available, the project assignments and wishes that the new status would dissolve are also listed with project, type (binding/wish) and days. Free dissolves binding assignments and wishes, Work-free day and Not available only wishes. If only assignments are affected, you confirm with Change status anyway. Multi-edit in the workforce panel only asks about the project assignments when it changes the status; it does not remove shifts or individual times.
From here you can also open the shift history for this person and day. Request work time change is only available on your own shift — requests are always bound to the signed-in person and their assignment to the shift (see Requesting a working-time correction).
Individual times add working time not attached to a shift, such as office work, home office or training. They can be created individually or as a recurring series for several people, so these times are included in the daily and weekly view as well.
Info window
The info icon on the person tile opens the info window (permission View staff info data). The icon exists only for internal users, not for freelancers and service providers. The window has the tabs Season-related data, Substitute days off and Vacation; each tab loads its data only when opened. If work time accounting is switched on in the shift settings, the tabs Actual hours (month by month) and Overtime are added. For other people, these two tabs only show data if you also hold the permission View hour accounts or HR administration. With the permission Pay out overtime you book out payable overtime in a documented way in the Overtime tab; previous payouts remain in the history. What the figures mean is explained under Understanding a person's key figures and Paying out overtime.
Project assignments and project wishes
People can be assigned to a project directly in the duty roster — for individual days or the entire project period — before any concrete shifts exist. Personnel planning can start earlier, and everyone sees who is earmarked for which production. The feature can be switched off in the shift settings under Project assignments; all sections, stripes and buttons described here are then missing.
Binding assignment (for planners): In a person's day modal you'll find the Projects section. Via Assign project you bindingly assign the person to a project, either for Single day(s) or for the Entire project period; several days are picked in an inline calendar. You need the permission Plan shifts for this. Projects whose period includes the selected days are suggested first; the search finds all others. The project period runs from the earliest to the latest event of the project. If the project has events with an event type marked as Relevant for project period, only those count. A project without events has no period and can only be assigned day by day, and the same applies to a project whose period is longer than two years.
An assignment for the entire project period "moves along": if the project shifts in time, it adapts automatically. Assignments for single days do not move along. If such a day lies outside the project period after an event was changed, the assignment is dissolved. In the event dialog, Artwork asks before saving and lists the affected people and days. For binding assignments, planners and the affected person are notified.
When assigning on days off or absence days, Artwork warns and only saves once you confirm with Assign anyway. Days on which the person is already in a shift of the same project or is already assigned are skipped. Internal users are added to the project team with the assignment and are notified about new, accepted and removed assignments. The assignment appears as a coloured stripe in the day cell. Via multi-edit in the workforce panel you assign all selected people on the selected days in one step; only projects whose period covers all selected days can be chosen there. You remove an assignment in the day modal with Remove for this day only or Remove entire assignment.
If an assigned person is placed into a shift of the same project, the shift replaces the assignment on the days of the shift. If the person is removed from the shift again or the shift is deleted, the assignment comes back. It does not come back if the person is still in another shift of the project on that day or has meanwhile been given the status Free. In the daily view, in the project's shifts tab and in the list view with Detailed function overview per shift, assigned people are listed first in the selection list of an open slot, bindingly assigned people before people with a wish (see staffing shifts). Assignments also appear in My operational plan, in the project's shifts tab (display setting Show project assignments) and, binding ones only, in the PDF export of the personal operational plan. In the shifts tab, the Assigned persons overview has three columns: Entire project period, Single days and Wishes. Single days are bundled per person into ranges; planners expand them into day chips and remove individual days. Via Assign person you assign people directly to the project there. People who may not see the duty roster also see their own assignments and wishes in the overview, but only their own.
Project wishes (for employees): In My operational plan a person enters themselves, non-bindingly, as a wish for a project via the heart icon in the day header (Enter project wish), likewise for individual days or the whole period. The same works in the project's shifts tab via Enter wish and in the day modal of your own row. Everyone can enter a wish only for themselves. Planners see wishes as a striped stripe in the day cell and when staffing shifts of the project. In the day modal, Accept turns the wish into a binding assignment for all days of that wish. No wish is possible on days with a registered absence; if the person enters an absence later, the wish is dropped on those days.
Daily view
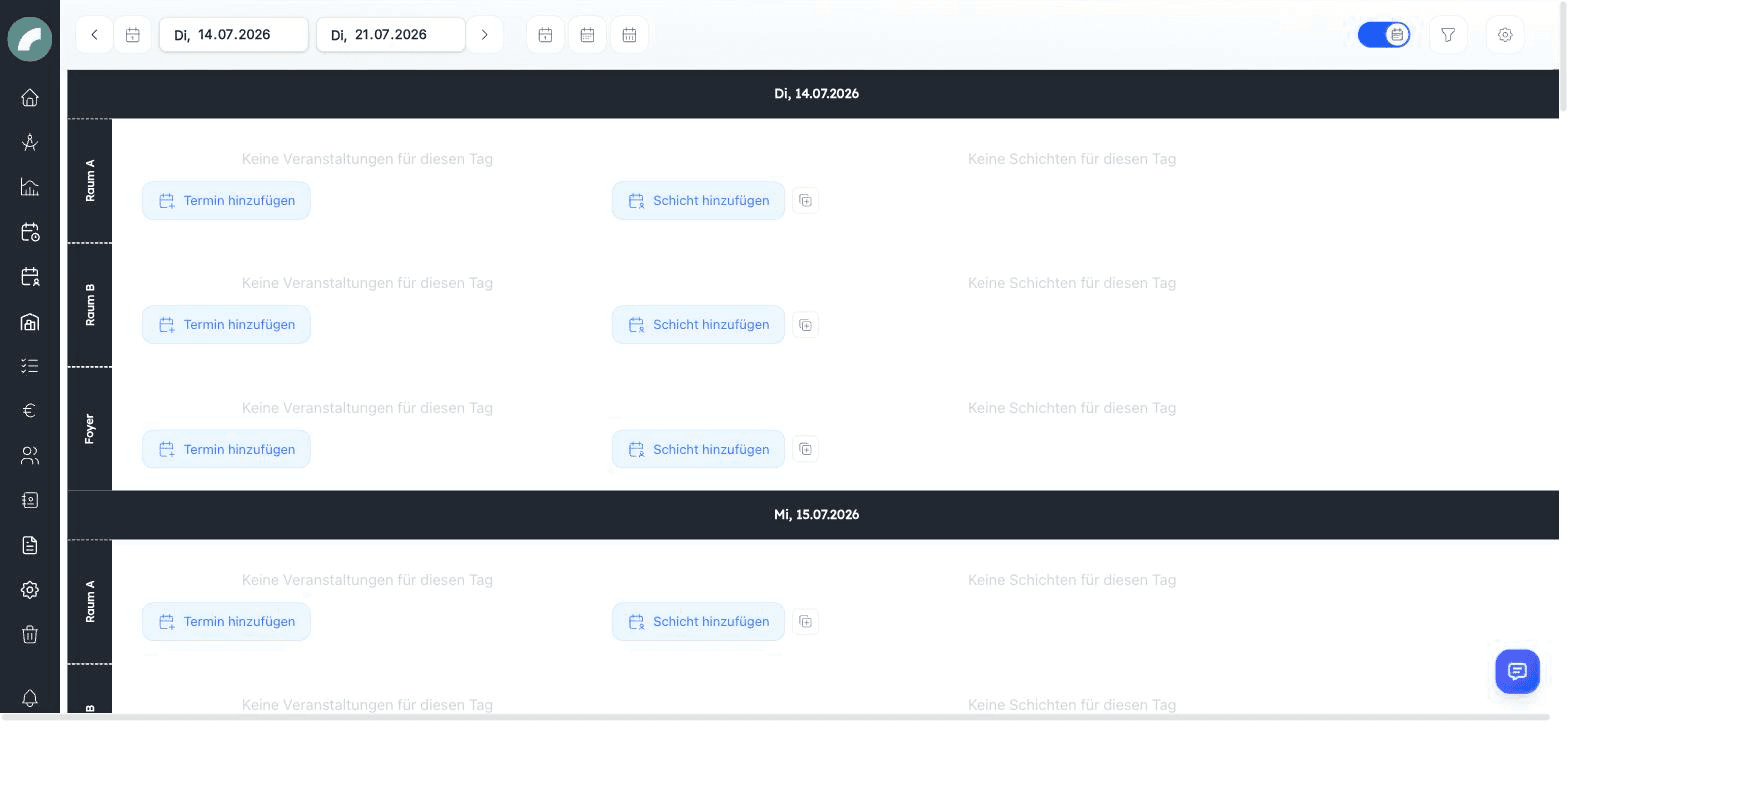
The Day view turns the grid into a day-by-day list — each day becomes a section with one row per room: events on the left, shifts on the right. It shows at most 8 days and is ideal for the detailed planning of a single day or for use on the event day. Artwork cuts a longer period from the start date and points this out with Maximum of 8 days possible in the daily view of the shift plan Coming with the next update. There is no drag & drop here: you staff a slot by clicking Unoccupied and picking the person from the list. You also look for a replacement after a decline and record replies on a person's behalf via the assignment menu.
List view
The List view (also reachable via Shift plan → Shift plan list view) shows all shifts of a period as a list, grouped by day and below that by room. It is the fastest way to review staffing status:
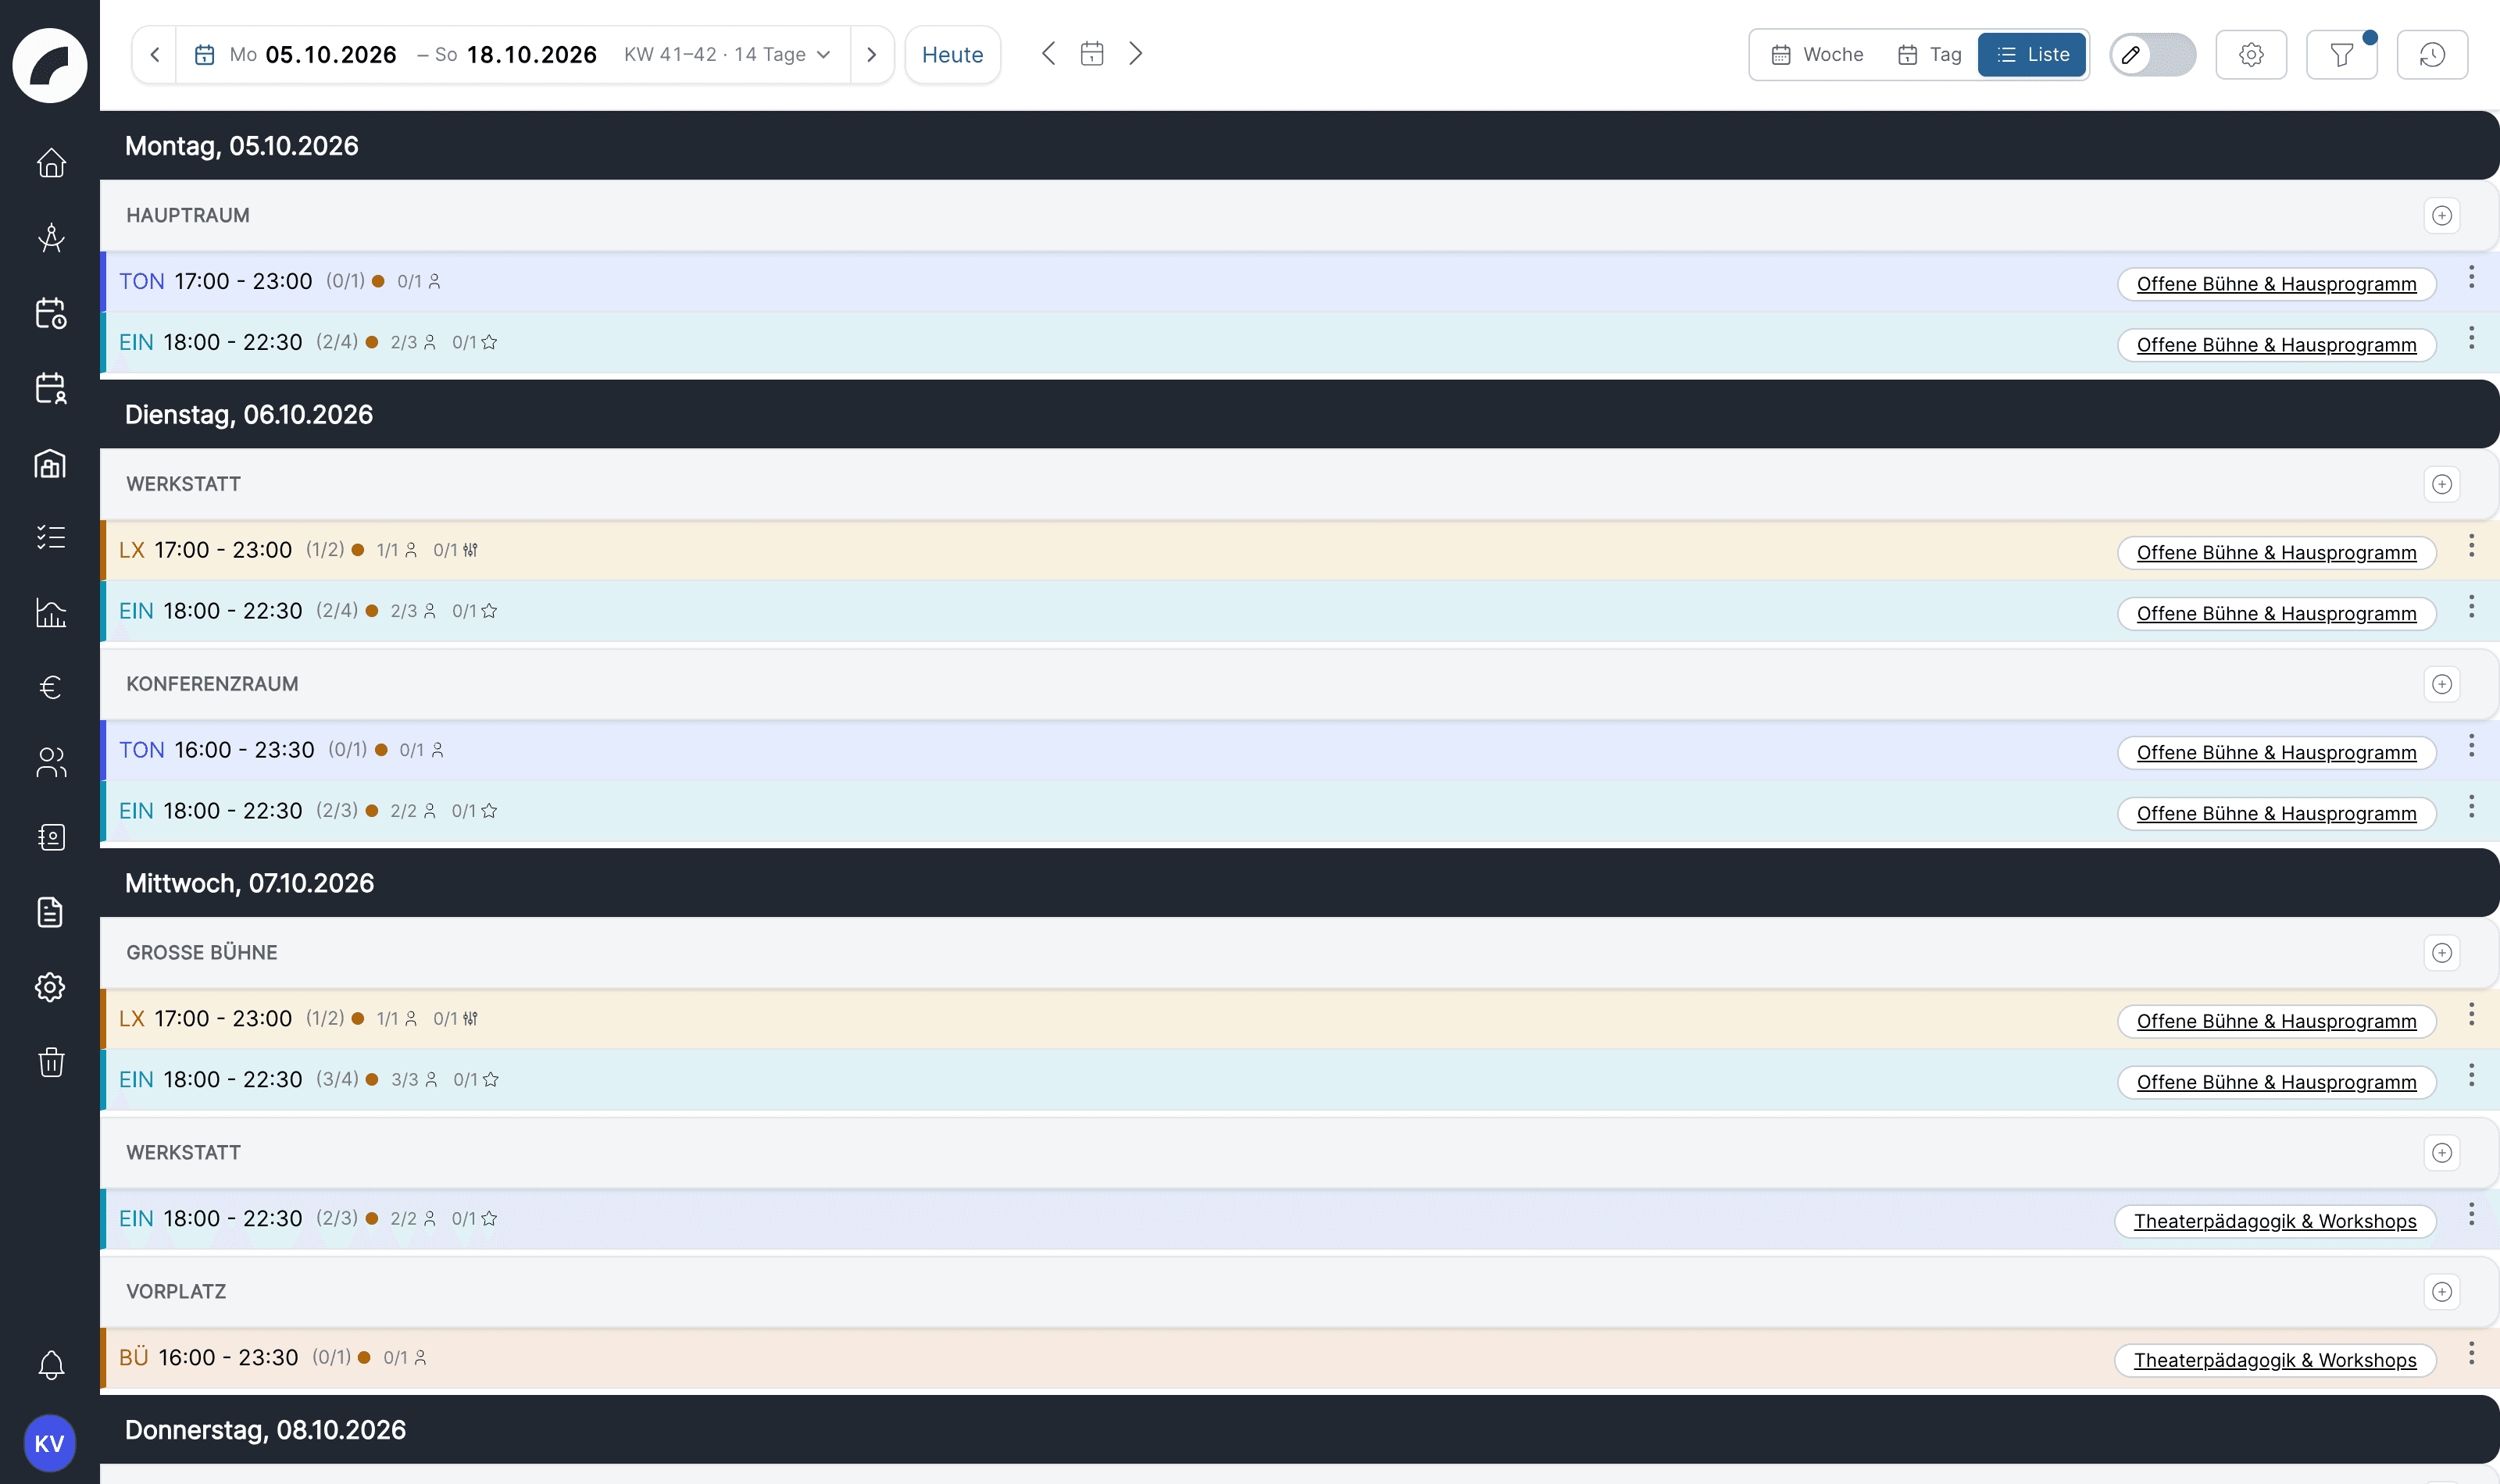
Each row shows the craft abbreviation, the time, the occupancy (2/3 = two of
three slots filled) with a status dot (green fully staffed, orange partial,
red empty) and the per-function breakdown. Instead of the dot, a warning
triangle is shown when an assigned person is not available on that day. If
the shift belongs to a project, the project name at the end of the row leads
to the project's shifts tab. The three-dot menu of the row contains Edit
shift and Show in shift plan. With the permission Plan shifts you
create new shifts right in the list via Add Shift.
The pencil switch in the function bar turns on multi-select: every shift row gets a checkbox, and above the list the number of selected shifts appears together with Duplicate and Delete. Both actions require the permission Plan shifts; without it the switch can still be turned on, but the action is rejected with an error message. The same applies to the whole selection as soon as it contains a shift of a craft you may not plan.
- Duplicate creates each selected shift once more on the same day in the same room, with the same times and the same demand per function, but without assigned people. The copy is not committed and not requested, even if the original is, and does not belong to the series of the original.
- Delete moves the selected shifts to the recycle bin after a confirmation prompt, including committed and staffed ones. For committed shifts, the assigned users and the planners of the craft are notified.
If Hide shift row is active in the display settings, there are no checkboxes; switch the option off for multi-select.
With Detailed function overview per shift, each shift additionally shows its slots. There you staff a slot via Unoccupied, as in the daily view.
The list has its own display settings — Show fully staffed shifts, Show appointments, Sort by shift groups, Detailed function overview per shift with Hide shift row, Show description, Show Shift group tag — described under List view only. The function bar also contains the Today button, the scroll mode (here the arrows shift the period by 1, 7 or 30 days) and the history. A lock marks committed shifts, a request icon requested ones. Show in shift plan opens the week view with the calendar week of the shift and highlights the shift there; the period of the week view is set to that week in the process.
Help & legend
The info icon in the function bar opens the help panel with three areas:
- Legend — what the markers in the cells mean: staffing traffic light, lock for committed shifts, Approval requested, Changed after commitment, warning triangle for open and check chip for processed rule violations, Assigned but not available, overbooking, day service, special day, substitute day off and the reply pills.
- Operation — the most important actions of the current view.
- Workflow — the path from the shift via the assignment to commitment and approval.
The explanatory box on how a shift is built, which used to sit in the shift dialog, lives here.
When the grid stays empty
If the week or day grid shows nothing, a notice names the reason and the next sensible step:
| Notice | Cause and next step |
|---|---|
| No rooms released for the duty roster | No room is visible. Only rooms with the room property Relevant for disposition appear in the duty roster; a link leads to the room management. If a filter or the display setting Hide unoccupied rooms is active, the notice says so. |
| Master data missing | There are no crafts or no functions yet. The notice shows what is missing and links to the shift settings. |
| No shifts in this period | Nothing is planned in the period. Planners start right away via Add Shift or Add Shift based on templates. |
| All shifts are hidden | The period contains shifts, but a filter, Only show shifts that are not fully staffed or Hide unoccupied days hides all of them. The notice lists the causes that apply. |
The notice can be closed. People without planning rights get a pointer to the responsible people instead of the buttons.
Shift history
The History button opens the shift history: a log of every change made to shifts — who created, edited, staffed, committed or deleted what, and when. Especially useful after a plan was committed, since late changes must be accounted for. Besides shifts, the history also logs day entries of people: availability and absence, notes, individual times, day services, substitute days off and project assignments. Anyone who may view the duty roster can open the history.
The left column separates two blocks:
- Data selection: loads the entries from the server, filtered by period (refers to the shift start, not to the change date), craft and person. If you open the history from the function bar, nothing is loaded at first; Load history fetches the entries. After that, every change to period, craft or person reloads automatically. Choosing a person loads immediately.
- Narrow down — takes effect immediately on the loaded entries without reloading: Search in results (with highlighting), Kind of change, Shift (searchable dropdown; deleted shifts are marked) and Only subsequent changes (after commitment). To search server-wide, press Enter or use Search in all entries.
50 entries are loaded at a time; the summary above the list shows how many of how many are loaded, and Load more at the end of the list fetches the next ones. Narrow down only affects the entries already loaded. Under Kind of change you choose between Staffing, Shift details, Shift created/deleted and Commitment & request; further kinds such as Confirmations, Availability & absence, Notes and Other day entries appear as soon as such entries are loaded.
The Person field accepts users, freelancers and service providers and has three scopes: Only actions on the person, Person + their shifts (default — shows, for example, when the shift the person is in was committed) and Also carried out by the person. Each entry then says why it is listed: Concerns Max, Max is scheduled in this shift or Carried out by Max.
Above the list a summary shows the active filters as removable chips and Reset all. There you also choose the grouping: by change date (newest first) or by shift day; the day headings say what the date means.
Each entry shows its shift in a header line ("#12249 · Tue 18.08.2026 · 14:00–22:00 · CS · Hauptraum · project"); the before/after table can be expanded. Creation entries are labelled Shift created, edits Shift data changed; staffing entries show person and function as a chip. When grouped by shift day, all actions of one shift form a timeline under one header; clicking the header shows only this shift, and a fixed header line with Show all shifts appears at the top. An empty result explains what is empty and offers the next step — such as Expand period to whole months or Include their shifts.
The history opens in several places with a matching preset: from the function bar (empty, current period), from the day modal (person and day preset), from My operational plan (person preset), via the clock icon Show history of this day, which appears in the week view when hovering over a day header (all people on that day), and from the dialog of an existing shift via the Shift history button (only this shift; the history opens on top of the dialog). Except when opened from the function bar, the entries are loaded right away. Export as Excel in the left column adopts period, craft and person filter; with a person filter the file contains the column Relation, see Exports.
Week status
The page Shift plan → Week status shows all crafts across several calendar weeks with commitment state, open requests, unacknowledged changes, open rule violations, open slots and request deadline — the overview before you commit. It is described under Committing & Approval.
My operational plan
Every worker has a personal counterpart to the duty roster: Shift plan → My operational plan lists only your own shifts (permission View own roster; it controls access, not just the menu entry). Workers who cannot see the full duty roster still see their own assignments here.
Committed and provisional assignments are distinguishable. Your house can decide in the shift settings that people only see their shifts in their own roster once they are committed (Uncommitted shifts in own roster); the permission View own uncommitted shifts exempts individual people. Whether draft shifts already appear in the calendar subscription is also set centrally in the shift settings. In case of deviations, the person can request a work time change without editing the roster.
From their own operational plan, workers can also enter project wishes and — when Shift confirmation by employees is active and they hold the permission Accept or decline shifts — accept or decline shifts (see Committing & Approval). Everything else about the personal roster is covered under Personal Roster & Working Time.
Last updated on